

Installation Guide
The Roman Shower complies with current building and technology standards and utilises existing materials, manufacturing methods and installation processes. Therefore anyone installing it does not have to modify standard practices.
The Roman Shower provides a considerable cost saving in all applications.
The installation of the Roman Shower is straightforward as it uses standard materials and methods so the installer does not have to modify current trade practices. The flexibility of size, installation location, variety of finishes and fittings available, added to its considerable benefits, give it many benefits over existing offerings.
As an Australian innovation, the design and production quality is paramount to our business and customers.
The Roman Shower can be retrofitted as part of renovations to an existing premises or installed into new premises, whether residential or commercial.
Detailed drawings, specifications and installation procedures can be supplied on request. Three standard sizes are available for ease of installation.

Example Installation

1. Preparation
Remove the existing shower/bath or provide a new installation space. Your Roman Shower doesn’t have to be installed into the end bathroom niche as shown above. You can choose any suitable space and vary the installation to suit.
Next, prepare the walls and floor for installation.
The floor and walls can be concrete or you can have a stud wall with a joist located under the floor and wall coverings to support the Roman Shower frame and weight of bath water.
The walls require the appropriate wet-room coverings, in this case cement sheeting
2. Frame installation
Install the Roman Shower frame securely, fastening it using mechanical fasteners and waterproof high strength adhesive to the floor and walls. It can be installed at varying distances from the back wall. We recommended approximately 850 mm (33.46 inches) from the rear wall, to provide optimal space for the shower and bath while minimizing the water required for the bath.

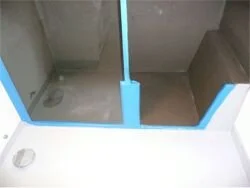
3. Waterproof
Waterproof the wet area, either with a waterproof membrane (as shown) or an appropriate waterproof base and wall sheet coverings.

4. Tile, glass and finishing
Screed the wet area floor to create fall and a solid base to lay the shower and bath coverings; or apply a pre-moulded base for the wet area.
Apply coverings such as tiles, glass or plastic panels.
Finish by attaching the toughened glass shower screen and bath door.